经典现代卷积网络1-AlexNet

前言

接下来一次介绍现代卷积神经网络的架构:

  • AlexNet。它是第一个在大规模视觉竞赛中击败传统计算机视觉模型的大型神经网络;

  • 使用重复块的网络(VGG)。它利用许多重复的神经网络块;

  • 网络中的网络(NiN)。它重复使用由卷积层和卷积层(用来代替全连接层)来构建深层网络;

  • 含并行连结的网络(GoogLeNet)。它使用并行连结的网络,通过不同窗口大小的卷积层和最大汇聚层来并行抽取信息;

  • 残差网络(ResNet)。它通过残差块构建跨层的数据通道,是计算机视觉中最流行的体系架构;

  • 稠密连接网络(DenseNet)。它的计算成本很高,但给我们带来了更好的效果

LeNet

在LeNet提出后的将近20年里,神经网络一度被其他机器学习方法超越,如支持向量机. LeNet可以在早期的小数据集上取得好的成绩,但是在更大的真实数据集上的表现并不尽如人意.

一节看到,神经网络可以直接基于图像的原始像素进行分类。这种称为端到端(end-to-end)的方法节省了很多中间步骤。 这类图像分类研究的主要流程是:

  1. 获取图像数据集;
  2. 使用已有的特征提取函数生成图像的特征;
  3. 使用机器学习模型对图像的特征分类。

与训练端到端(从像素到分类结果)系统不同,经典机器学习的流水线看起来更像下面这样:

  1. 获取一个有趣的数据集。在早期,收集这些数据集需要昂贵的传感器(在当时最先进的图像也就100万像素)。
  2. 根据光学、几何学、其他知识以及偶然的发现,手工对特征数据集进行预处理。
  3. 通过标准的特征提取算法,如SIFT或其他手动调整的流水线来输入数据。
  4. 将提取的特征送入最喜欢的分类器中(例如线性模型或其它核方法),以训练分类器。

2012年,AlexNet横空出世。它首次证明了学习到的特征可以超越手工设计的特征。它一举打破了计算机视觉研究的现状,通过CNN学习特征 。 AlexNet使用了8层卷积神经网络,并以很大的优势赢得了2012年ImageNet图像识别挑战赛。
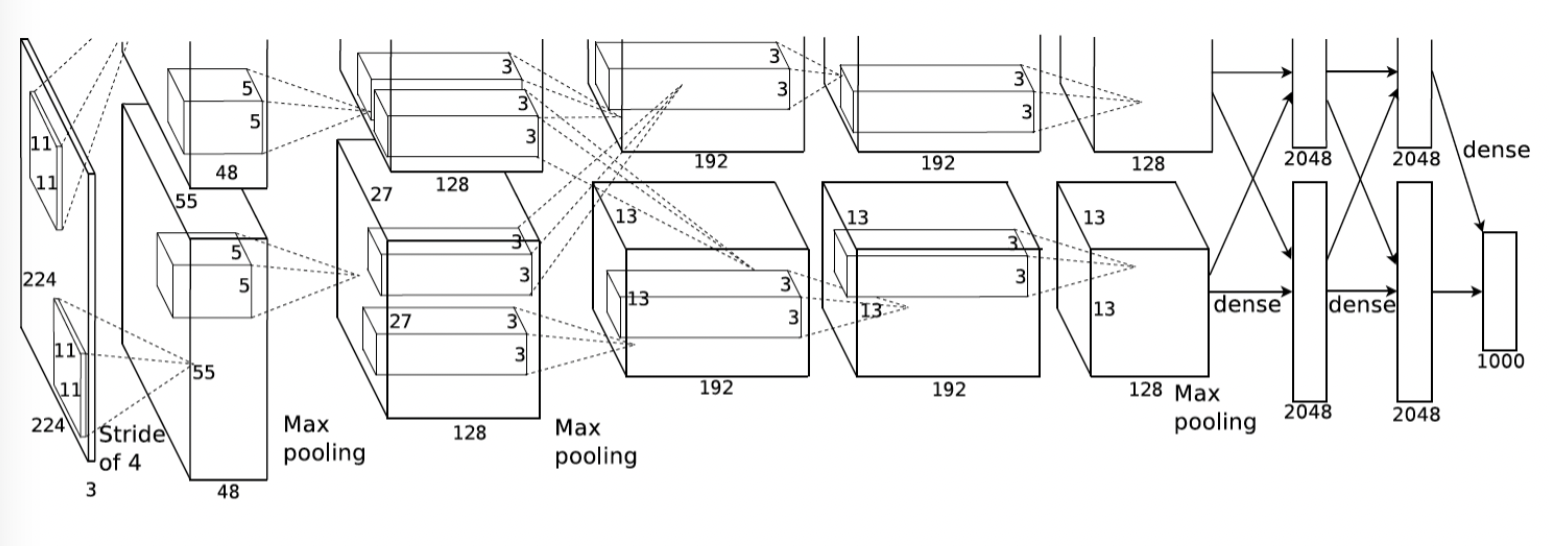
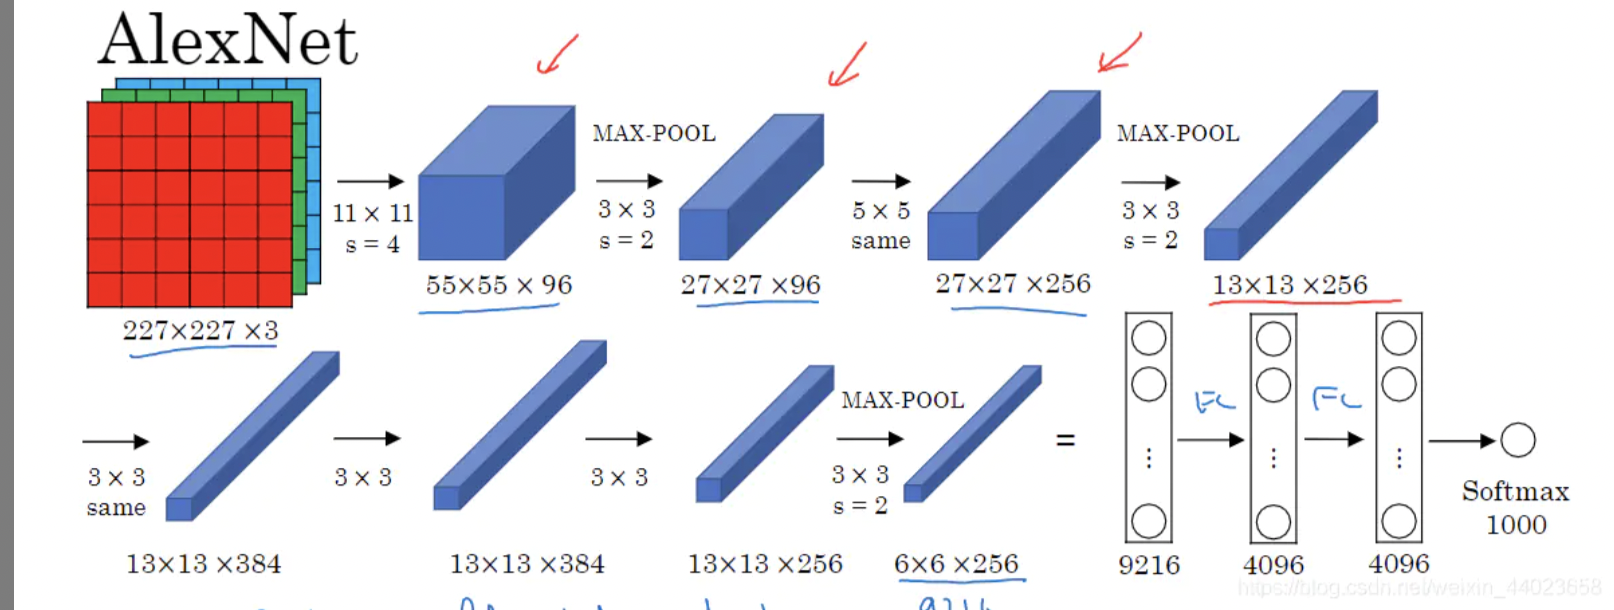
AlexNet网络结构图 20220915175040

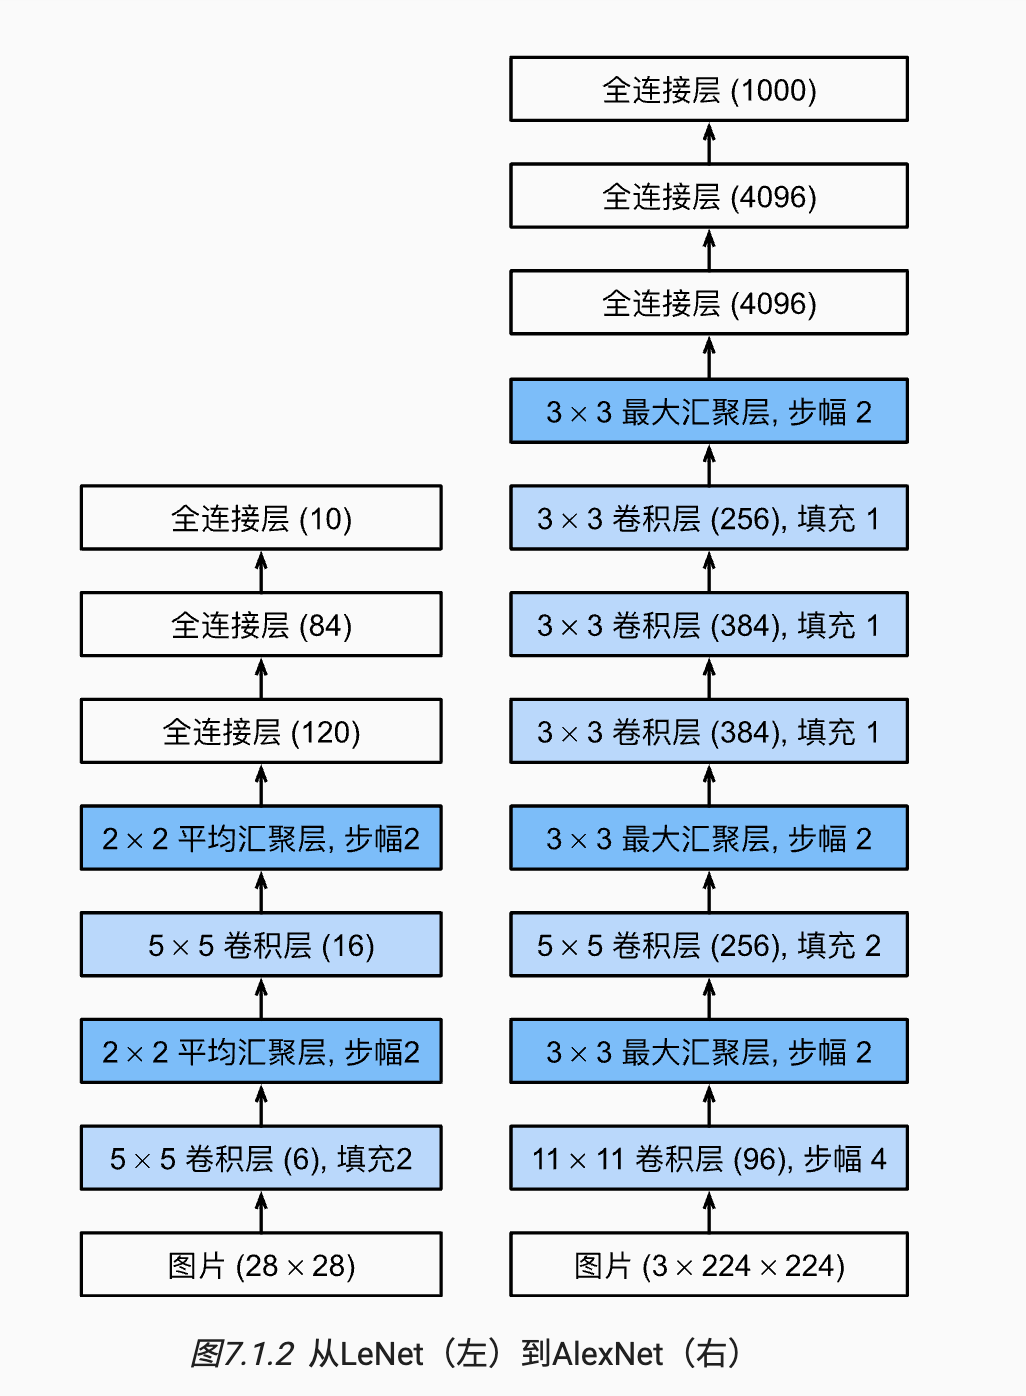
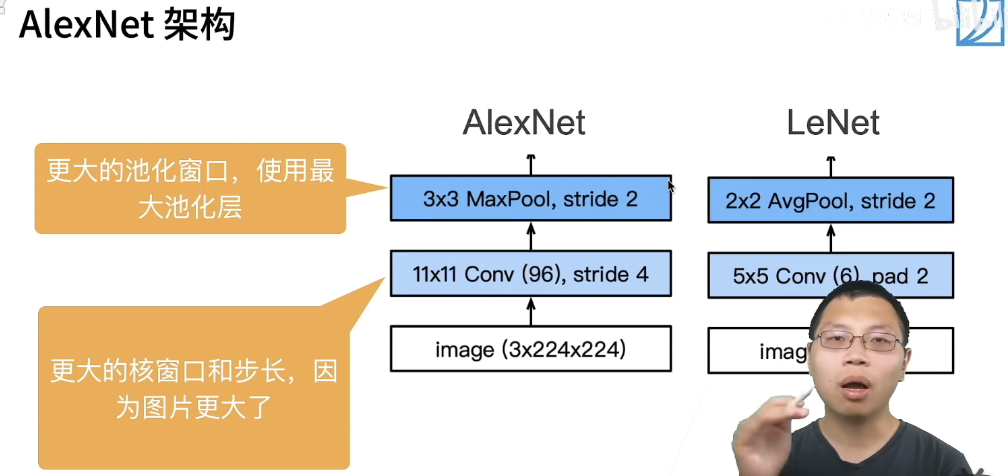
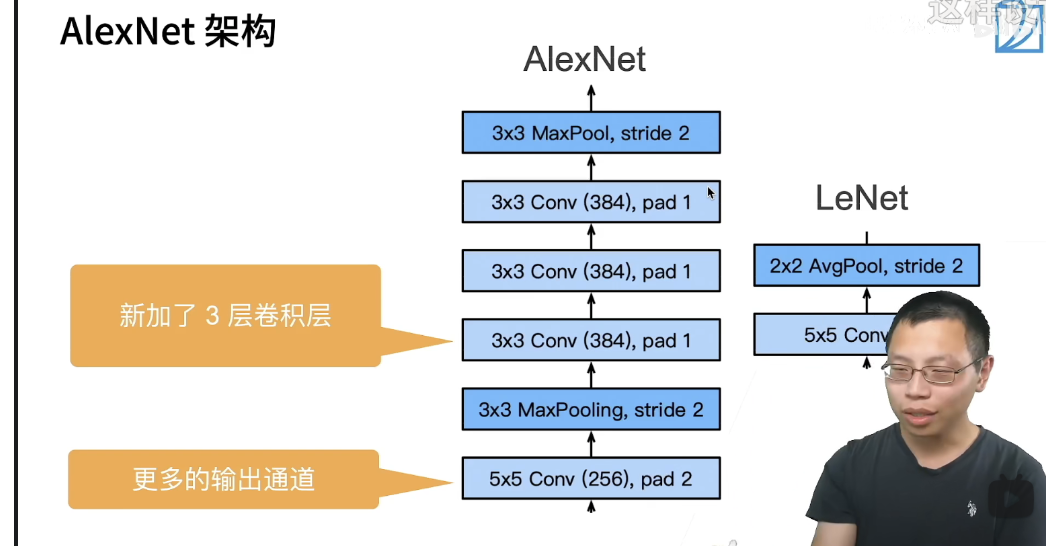
简化的两个网络的对比: https://geoer666-1257264766.cos.ap-beijing.myqcloud.com/20220915161233.png

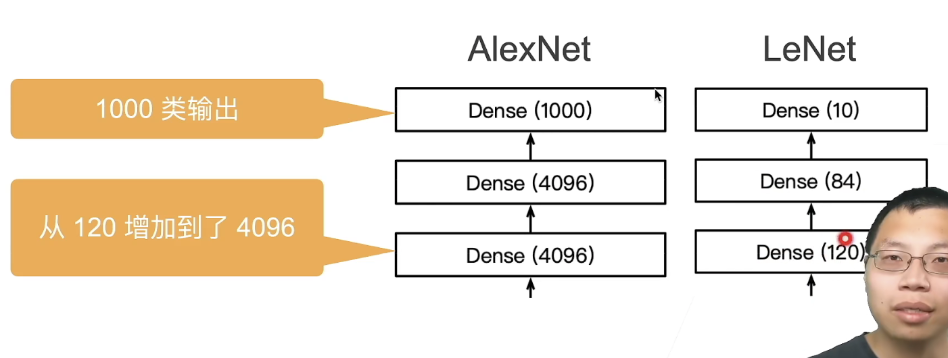
  • stride=4 是受限于当时的算力所致 20220915172813 20220915172838 20220915172900

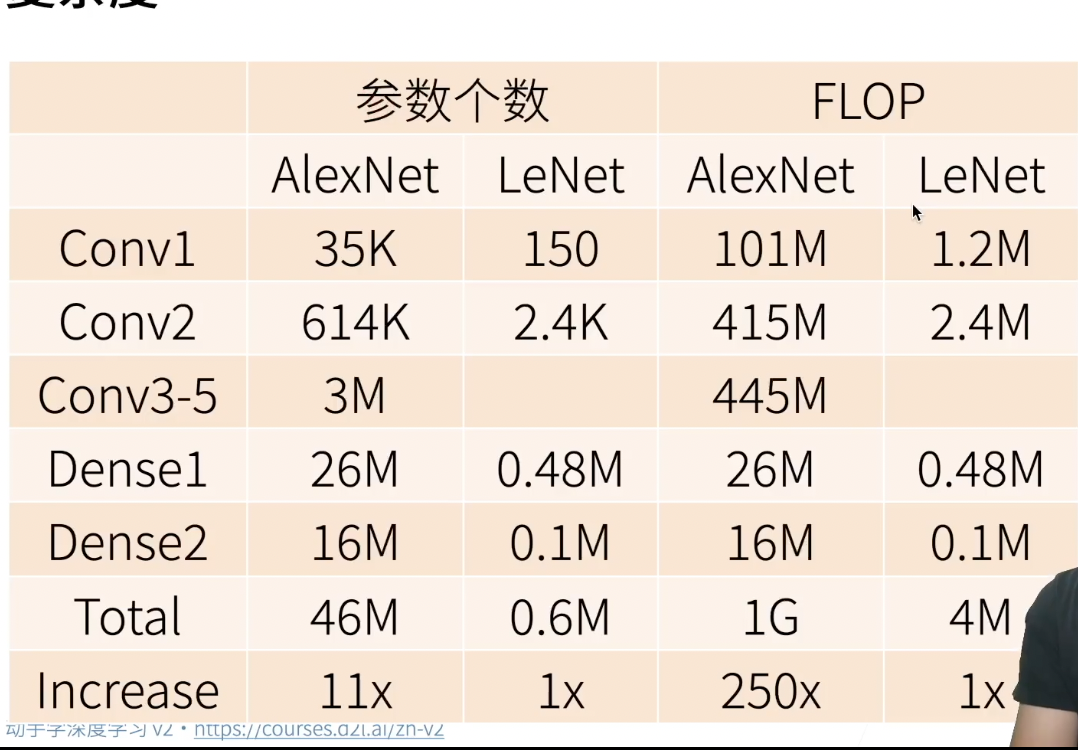
复杂度对比: 20220915172721

AlexNet与LeNet区别

AlexNet与LeNet的设计理念非常相似,但也有显著的区别。

  • 第一,与相对较小的LeNet相比,AlexNet包含8层变换,其中有5层卷积和2层全连接隐藏层,以及1个全连接输出层。 在AlexNet的第一层,卷积窗口的形状是。 由于ImageNet中大多数图像的宽和高比MNIST图像的多10倍以上,因此,需要一个更大的卷积窗口来捕获目标。 第二层中的卷积窗口形状被缩减为,然后是。 此外,在第一层、第二层和第五层卷积层之后,加入窗口形状为、步幅为2的最大汇聚层。 而且,AlexNet的卷积通道数目是LeNet的10倍。 在最后一个卷积层后有两个全连接层,分别有4096个输出。 这两个巨大的全连接层拥有将近1GB的模型参数。 由于早期GPU显存有限,原版的AlexNet采用了双数据流设计,使得每个GPU只负责存储和计算模型的一半参数。 幸运的是,现在GPU显存相对充裕,所以我们现在很少需要跨GPU分解模型(因此,我们的AlexNet模型在这方面与原始论文稍有不同)
  • 第二,AlexNet将sigmoid激活函数改成了更加简单的ReLU激活函数。
  • 第三,AlexNet通过丢弃法来控制全连接层的模型复杂度。而LeNet没有使用丢弃法,而只是使用了权重衰减。(在隐藏全连接层厚加入了丢弃层)
  • 第四,AlexNet引入了大量的图像增广,如翻转、裁剪和颜色变化,从而进一步扩大数据集来缓解过拟合。

AlexNet跟LeNet结构类似,但使用了更多的卷积层和更大的参数空间来拟合大规模数据集ImageNet。它是浅层神经网络和深度神经网络的分界线。

实现AlexNet

稍微简化的AlexNet:

 1
 2
 3
 4
 5
 6
 7
 8
 9
10
11
12
13
14
15
16
17
18
19
20
21
22
23
24
25
26
27
28
29
30
31
32
33
34

import time
import torch
from torch import nn, optim
import torchvision

net = nn.Sequential(
    nn.Conv2d(1,96,kernel_size=11,stride=4,padding=1),   # [1, 96, 54, 54]
    nn.ReLU(),
    nn.MaxPool2d(kernel_size=3,stride=2), # [1,96,26,26]
 
    nn.Conv2d(96,256,kernel_size=5,padding=2),
    nn.ReLU(),
    nn.MaxPool2d(kernel_size=3,stride=2),  

    nn.Conv2d(256,384,kernel_size=3,padding=1),nn.ReLU(),
    nn.Conv2d(384,384,kernel_size=3,padding=1),nn.ReLU(),  # (384-3+2)/1 + 1 = 384
    nn.Conv2d(384,256,kernel_size=3,padding=1),nn.ReLU(),
    nn.MaxPool2d(kernel_size=3,stride=2), nn.Flatten(), # [1, 256, 5, 5] --->[1, 6400] flatten默认从维度1开始flatten

    nn.Linear(6400,4096),nn.ReLU(),nn.Dropout(p=0.5),
    nn.Linear(4096,4096),nn.ReLU(),nn.Dropout(p=0.5),
    nn.Linear(4096,10)
)


# 这里可以预先检查一下,输入输出是否合理
X = torch.rand(size=(1,1,224,224),dtype=torch.float32)
for layer in net:
    X = layer(X)
    # \t相当于tab按键
    print(layer.__class__.__name__,'output shape: \t',X.shape)
# 尝试用X进行试验,可以看出每层输出的维度,这样也可以使得输入输出按照自己需求来

1.加载数据: ImageNet数据集中图片的大小为369*387, 我们这里使用Fashion-MNIST数据集来演示AlexNet。读取数据的时候我们额外做了一步将图像高和宽扩大到AlexNet使用的图像高和宽224。这个可以通过torchvision.transforms.Resize实例来实现。也就是说,我们在ToTensor实例前使用Resize实例,然后使用Compose实例来将这两个变换串联以方便调

 1
 2
 3
 4
 5
 6
 7
 8
 9
10
11
12
13
14
15
16
17
18
19
20
21
22
23
def load_data_fashion_mnist(batch_size, resize=None, root='~/Datasets/FashionMNIST'):
    """Download the fashion mnist dataset and then load into memory."""
    if sys.platform.startswith('win'):
        num_workers = 0
    else:
        num_workers = 4
    trans = []
    if resize:
        trans.append(torchvision.transforms.Resize(size=resize))
    trans.append(torchvision.transforms.ToTensor())

    transform = torchvision.transforms.Compose(trans)
    mnist_train = torchvision.datasets.FashionMNIST(root=root, train=True, download=True, transform=transform)
    mnist_test = torchvision.datasets.FashionMNIST(root=root, train=False, download=True, transform=transform)

    train_iter = torch.utils.data.DataLoader(mnist_train, batch_size=batch_size, shuffle=True, num_workers=4)
    test_iter = torch.utils.data.DataLoader(mnist_test, batch_size=batch_size, shuffle=False, num_workers=4)

    return train_iter, test_iter

batch_size=128
train_iter, test_iter=load_data_fashion_mnist(batch_size, resize=224)
# 如出现“out of memory”的报错信息,可减小batch_size或resize

2.构建模型:

 1
 2
 3
 4
 5
 6
 7
 8
 9
10
11
12
13
14
15
16
17
18
19
20
21
22
23
24
25
26
27
28
29
30
31
32
33
34
35
36
37
38
39
40
41
42
43
44
45
46
47
48
49

import time
import torch
from torch import nn, optim
import torchvision

import d2lzh_pytorch as d2l
device = torch.device('cuda' if torch.cuda.is_available() else 'cpu')

class AlexNet(nn.Module):
    def __init__(self):
        super(AlexNet, self).__init__()
        self.conv = nn.Sequential(
            nn.Conv2d(1, 96, 11, 4), # in_channels, out_channels, kernel_size, stride, padding
            nn.ReLU(),
            nn.MaxPool2d(3, 2), # kernel_size, stride

            # 减小卷积窗口,使用填充为2来使得输入与输出的高和宽一致,且增大输出通道数
            nn.Conv2d(96, 256, 5, 1, 2),
            nn.ReLU(),
            nn.MaxPool2d(3, 2),

            # 连续3个卷积层,且使用更小的卷积窗口。除了最后的卷积层外,进一步增大了输出通道数。
            # 前两个卷积层后不使用池化层来减小输入的高和宽
            nn.Conv2d(256, 384, 3, 1, 1),
            nn.ReLU(),
            nn.Conv2d(384, 384, 3, 1, 1),
            nn.ReLU(),
            nn.Conv2d(384, 256, 3, 1, 1),
            nn.ReLU(),
            nn.MaxPool2d(3, 2)
        )

         # 这里全连接层的输出个数比LeNet中的大数倍。使用丢弃层来缓解过拟合
        self.fc = nn.Sequential(
            nn.Linear(256*5*5, 4096),
            nn.ReLU(),
            nn.Dropout(0.5),
            nn.Linear(4096, 4096),
            nn.ReLU(),
            nn.Dropout(0.5),
            # 输出层。由于这里使用Fashion-MNIST,所以用类别数为10,而非论文中的1000
            nn.Linear(4096, 10),
        )

    def forward(self, img):
        feature = self.conv(img)
        output = self.fc(feature.view(img.shape[0], -1))
        return output

如果用imagenet的彩色图片就是:

 1
 2
 3
 4
 5
 6
 7
 8
 9
10
11
12
13
14
15
16
17
18
19
20
21
22
23
24
25
26
27
28
29
30
31
32
33
34
35
36
37
38
39
40
41
42
43
import torch.nn as nn
import torch
class AlexNet(nn.Module):
    def __init__(self, num_classes=1000, init_weights=False):   
        super(AlexNet, self).__init__()
        self.features = nn.Sequential(  #打包
            nn.Conv2d(3, 48, kernel_size=11, stride=4, padding=2),  # input[3, 224, 224]  output[48, 55, 55] 自动舍去小数点后
            nn.ReLU(inplace=True), #inplace 可以载入更大模型
            nn.MaxPool2d(kernel_size=3, stride=2),                  # output[48, 27, 27] kernel_num为原论文一半
            
            nn.Conv2d(48, 128, kernel_size=5, padding=2),           # output[128, 27, 27]
            nn.ReLU(inplace=True),
            nn.MaxPool2d(kernel_size=3, stride=2),                  # output[128, 13, 13]
            
            nn.Conv2d(128, 192, kernel_size=3, padding=1),          # output[192, 13, 13]
            nn.ReLU(inplace=True),
            
            nn.Conv2d(192, 192, kernel_size=3, padding=1),          # output[192, 13, 13]
            nn.ReLU(inplace=True),
            
            nn.Conv2d(192, 128, kernel_size=3, padding=1),          # output[128, 13, 13]
            nn.ReLU(inplace=True),
            
            nn.MaxPool2d(kernel_size=3, stride=2),                  # output[128, 6, 6]
        )
        self.classifier = nn.Sequential(
            nn.Dropout(p=0.5),
            #全链接
            nn.Linear(128 * 6 * 6, 2048),
            nn.ReLU(inplace=True),
            nn.Dropout(p=0.5),
            nn.Linear(2048, 2048),
            nn.ReLU(inplace=True),
            nn.Linear(2048, num_classes),
        )
        if init_weights:
            self._initialize_weights()

    def forward(self, x):
        x = self.features(x)
        x = torch.flatten(x, start_dim=1) #展平   或者view()
        x = self.classifier(x)
        return x

3.损失函数和优化方法:

1
2
3
lr = 0.
loss = torch.nn.CrossEntropyLoss()
optimizer = torch.optim.Adam(net.parameters(), lr=lr)

完整代码:

  1
  2
  3
  4
  5
  6
  7
  8
  9
 10
 11
 12
 13
 14
 15
 16
 17
 18
 19
 20
 21
 22
 23
 24
 25
 26
 27
 28
 29
 30
 31
 32
 33
 34
 35
 36
 37
 38
 39
 40
 41
 42
 43
 44
 45
 46
 47
 48
 49
 50
 51
 52
 53
 54
 55
 56
 57
 58
 59
 60
 61
 62
 63
 64
 65
 66
 67
 68
 69
 70
 71
 72
 73
 74
 75
 76
 77
 78
 79
 80
 81
 82
 83
 84
 85
 86
 87
 88
 89
 90
 91
 92
 93
 94
 95
 96
 97
 98
 99
100
101
102
103
104
105
106
107
108
109
110
111
112
113
114
115
116
117
118
119
120
121
import time
import torch
from torch import nn, optim
import torchvision

device = torch.device('cuda' if torch.cuda.is_available() else 'cpu')

def load_data_fashion_mnist(batch_size, resize=None, root='../data/FashionMNIST'):
    """
    下载/加载 fashion mnist数据集
    读取数据的时候我们额外做了一步将图像高和宽扩大到AlexNet使用的图像高和宽224。
    这个可以通过`torchvision.transforms.Resize`实例来实现。也就是说,
    我们在ToTensor实例前使用Resize实例,然后使用Compose实例来将这两个变换串联以方便调
    """
    # if sys.platform.startswith('win'):
    #     num_workers = 0
    # else:
    #     num_workers = 4
    trans = []
    if resize:
        trans.append(torchvision.transforms.Resize(size=resize))
    trans.append(torchvision.transforms.ToTensor())

    transform = torchvision.transforms.Compose(trans)
    mnist_train = torchvision.datasets.FashionMNIST(root=root, train=True, download=True, transform=transform)
    mnist_test = torchvision.datasets.FashionMNIST(root=root, train=False, download=True, transform=transform)

    train_iter = torch.utils.data.DataLoader(mnist_train, batch_size=batch_size, shuffle=True, num_workers=4)
    test_iter = torch.utils.data.DataLoader(mnist_test, batch_size=batch_size, shuffle=False, num_workers=4)

    return train_iter, test_iter


class AlexNet(nn.Module):
    def __init__(self):
        super(AlexNet, self).__init__()
        self.conv = nn.Sequential(
            nn.Conv2d(1, 96, kernel_size=11, stride=4, padding=1),  # [1, 96, 54, 54]
            nn.ReLU(),
            nn.MaxPool2d(3, 2),  # kernel_size, stride

            # 减小卷积窗口,使用填充为2来使得输入与输出的高和宽一致,且增大输出通道数
            nn.Conv2d(96, 256, kernel_size=5, padding=2),
            nn.ReLU(),
            nn.MaxPool2d(3, 2),

            # 连续3个卷积层,且使用更小的卷积窗口。除了最后的卷积层外,进一步增大了输出通道数。
            # 前两个卷积层后不使用池化层来减小输入的高和宽
            nn.Conv2d(256, 384, kernel_size=3, padding=1), nn.ReLU(),
            nn.Conv2d(384, 384, kernel_size=3, padding=1), nn.ReLU(),  # (384-3+2)/1 + 1 = 384
            nn.Conv2d(384, 256, kernel_size=3, padding=1), nn.ReLU(),
            nn.MaxPool2d(kernel_size=3, stride=2), nn.Flatten(),  # [1, 256, 5, 5] --->[1, 6400] flatten默认从维度1开始flatten
        )
        # 这里全连接层的输出个数比LeNet中的大数倍。使用丢弃层来缓解过拟合
        self.fc = nn.Sequential(
            nn.Linear(256*5*5, 4096), nn.ReLU(), nn.Dropout(p=0.5),
            nn.Linear(4096, 4096), nn.ReLU(), nn.Dropout(0.5),
            # 输出层:由于这里使用Fashion-MNIST,所以用类别数为10,而非论文中的1000
            nn.Linear(4096, 10),
        )

    def forward(self, img):
        feature = self.conv(img)
        output = self.fc(feature.view(img.shape[0], -1))
        return output


def evaluate_accuracy(data_iter, net, device=None):
    """
    精度评价
    """
    if device is None and isinstance(net, torch.nn.Module):
        # 如果没指定device就使用net的device
        device = list(net.parameters())[0].device
    acc_sum, n = 0.0, 0
    with torch.no_grad():
        for X, y in data_iter:
            net.eval()  # 评估模式, 这会关闭dropout
            acc_sum += (net(X.to(device)).argmax(dim=1) == y.to(device)).float().sum().cpu().item()     # torch.argmax(input, dim=None, keepdim=False)返回指定维度最大值的序号。也就是把dim这个维度的,变成这个维度的最大值的index:https://blog.csdn.net/qq_35812205/article/details/122368033
            net.train()  # 改回训练模式
            n += y.shape[0]
    return acc_sum / n


def train(net, train_iter, test_iter, batch_size, optimizer, device, num_epochs):
    """
    训练模型
    """
    net = net.to(device)
    print("training on ", device)
    loss = torch.nn.CrossEntropyLoss()  # 采用交叉熵损失
    for epoch in range(num_epochs):  # epoch 训练轮数
        train_l_sum, train_acc_sum, n, batch_count, start = 0.0, 0.0, 0, 0, time.time()
        for X, y in train_iter:
            X = X.to(device)
            y = y.to(device)
            y_hat = net(X)
            l = loss(y_hat, y)  # 计算损失
            optimizer.zero_grad()   # 梯度清零
            l.backward()    # 反向传播
            optimizer.step()    # 更新
            train_l_sum += l.cpu().item()   # train_l_sum是训练集损失
            train_acc_sum += (y_hat.argmax(dim=1) == y).sum().cpu().item()  # train_acc_sum是训练集精度
            n += y.shape[0]
            batch_count += 1

        # 评估在测试集精度
        test_acc = evaluate_accuracy(test_iter, net)
        print('epoch %d, loss %.4f, train acc %.3f, test acc %.3f, time %.1f sec'
              % (epoch + 1, train_l_sum / batch_count, train_acc_sum / n, test_acc, time.time() - start))


if __name__ == '__main__':
    batch_size, lr, num_epochs = 128, 0.001, 5
    train_iter, test_iter = load_data_fashion_mnist(batch_size, resize=224)
    net = AlexNet()

    optimizer = torch.optim.Adam(net.parameters(), lr=lr)
    train(net, train_iter, test_iter, batch_size, optimizer, device, num_epochs)

我不跑了,忽然发现我的小mac已经烫手了,才跑了一个epoch,用时15分钟….唉没有配置好点的电脑学习都学不了…… 呜呜

一些可视化地址: https://poloclub.github.io/cnn-explainer/ https://ezyang.github.io/convolution-visualizer/ https://cs.stanford.edu/people/karpathy/convnetjs/demo/cifar10.html https://visualgo.net/zh
0%