  1
  2
  3
  4
  5
  6
  7
  8
  9
 10
 11
 12
 13
 14
 15
 16
 17
 18
 19
 20
 21
 22
 23
 24
 25
 26
 27
 28
 29
 30
 31
 32
 33
 34
 35
 36
 37
 38
 39
 40
 41
 42
 43
 44
 45
 46
 47
 48
 49
 50
 51
 52
 53
 54
 55
 56
 57
 58
 59
 60
 61
 62
 63
 64
 65
 66
 67
 68
 69
 70
 71
 72
 73
 74
 75
 76
 77
 78
 79
 80
 81
 82
 83
 84
 85
 86
 87
 88
 89
 90
 91
 92
 93
 94
 95
 96
 97
 98
 99
100
101
102
103
|
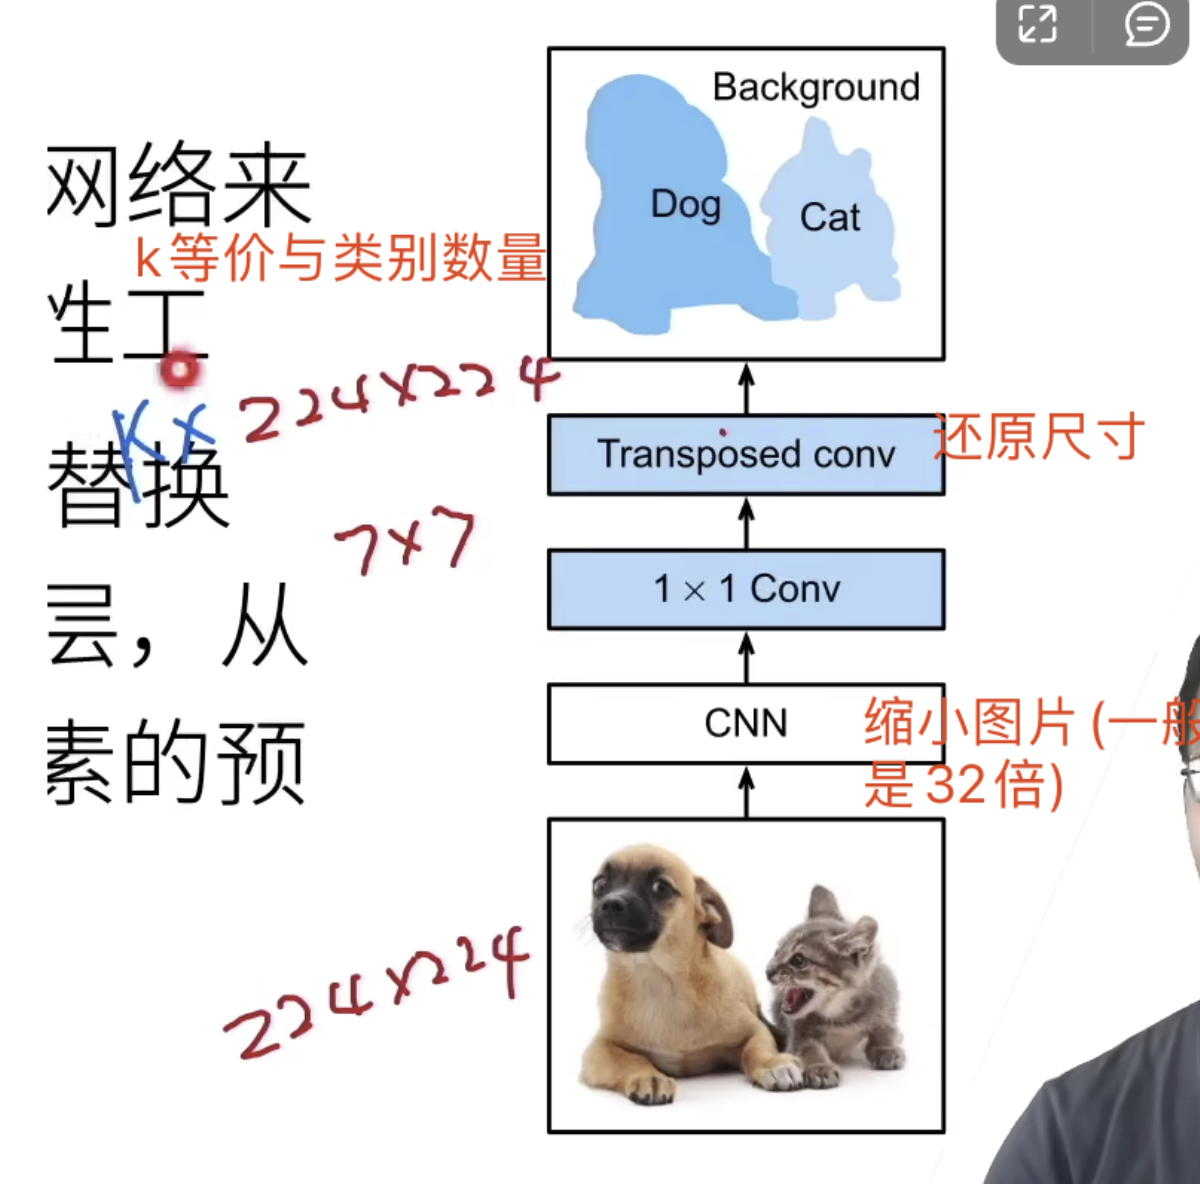
# 输出的类别预测与输⼊图像在像素级别上具有⼀⼀对应关系:通道维的输出即该位置对应像素的类别预测。


%matplotlib inline
import torch
import torchvision
from torch import nn
from torch.nn import functional as F
from d2l import torch as d2l


# 我 们 使 ⽤ 在ImageNet数 据 集 上 预 训 练 的ResNet-18模 型 来 提 取 图 像 特 征, 并 将 该 ⽹ 络 记为pretrained_net。ResNet-18模型的最后⼏层包括全局平均汇聚层和全连接层,然⽽全卷积⽹络中不需要它们。
pretrained_net = torchvision.models.resnet18(pretrained=True)
list(pretrained_net.children())[-3:]


# 接下来,我们创建⼀个全卷积⽹络net。它复制了ResNet-18中⼤部分的预训练层,去除了最后的全局平均汇聚层和最接近输出的全连接层。
net = nn.Sequential(*list(pretrained_net.children())[:-2])


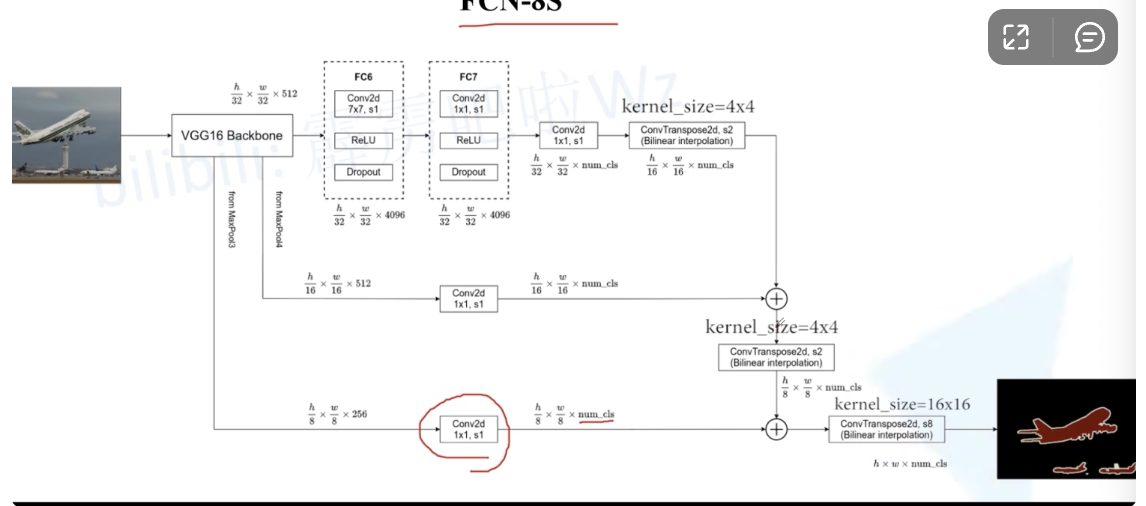
# 接下来,我们使⽤1 × 1卷积层将输出通道数转换为Pascal VOC2012数据集的类数(21类)。最后,我们需要将
# 特征图的⾼度和宽度增加32倍,从⽽将其变回输⼊图像的⾼和宽。

num_classes = 21
net.add_module('final_conv', nn.Conv2d(512, num_classes, kernel_size=1))
net.add_module('transpose_conv', nn.ConvTranspose2d(num_classes, num_classes,
kernel_size=64, padding=16, stride=32))
# 这里的转置卷积:一般卷积下采样多少,我们转置卷积就上采样多少
# 我们可以看到如果步幅为s,填充为s/2(假设s/2是整数)且卷积核的⾼和宽为2s,转置卷积核会将输⼊的⾼和宽分别放⼤s倍


# 初始化转置卷积层,双线性插值的上采样可以通过转置卷积层实现
def bilinear_kernel(in_channels, out_channels, kernel_size):
    factor = (kernel_size + 1) // 2
    if kernel_size % 2 == 1:
        center = factor - 1
    else:
        center = factor - 0.5
    og = (torch.arange(kernel_size).reshape(-1, 1),
        torch.arange(kernel_size).reshape(1, -1))
    filt = (1 - torch.abs(og[0] - center) / factor) *  (1 - torch.abs(og[1] - center) / factor)
    weight = torch.zeros((in_channels, out_channels,
        kernel_size, kernel_size))
    weight[range(in_channels), range(out_channels), :, :] = filt
    return weight


# 读取图像X,将上采样的结果记作Y。为了打印图像,我们需要调整通道维的位置。
img = torchvision.transforms.ToTensor()(d2l.Image.open('../img/catdog.jpg'))
X = img.unsqueeze(0)
Y = conv_trans(X)
out_img = Y[0].permute(1, 2, 0).detach()

d2l.set_figsize()
print('input image shape:', img.permute(1, 2, 0).shape)
d2l.plt.imshow(img.permute(1, 2, 0));
print('output image shape:', out_img.shape)
d2l.plt.imshow(out_img);


# 在全卷积⽹络中,我们⽤双线性插值的上采样初始化转置卷积层。对于1 × 1卷积层,我们使⽤Xavier初始化参数。
# W = bilinear_kernel(num_classes, num_classe, 64)
# net.transpose_conv.weight.data.copy_(W);


# 读取数据集
batch_size, crop_size = 32, (320, 480)
train_iter, test_iter = d2l.load_data_voc(batch_size, crop_size)


# 训练
def loss(inputs, targets):
    return F.cross_entropy(inputs, targets, reduction='none').mean(1).mean(1)
num_epochs, lr, wd, devices = 5, 0.001, 1e-3, d2l.try_all_gpus()
trainer = torch.optim.SGD(net.parameters(), lr=lr, weight_decay=wd)
d2l.train_ch13(net, train_iter, test_iter, loss, trainer, num_epochs, devices)

# 预测
def predict(img):
    X = test_iter.dataset.normalize_image(img).unsqueeze(0)
    pred = net(X.to(devices[0])).argmax(dim=1)
    return pred.reshape(pred.shape[1], pred.shape[2])

def label2image(pred):
    colormap = torch.tensor(d2l.VOC_COLORMAP, device=devices[0])
    X = pred.long()
    return colormap[X, :]


voc_dir = d2l.download_extract('voc2012', 'VOCdevkit/VOC2012')
test_images, test_labels = d2l.read_voc_images(voc_dir, False)
n, imgs = 4, []
for i in range(n):
    crop_rect = (0, 0, 320, 480) X = torchvision.transforms.functional.crop(test_images[i], *crop_rect)
    pred = label2image(predict(X))
    imgs += [X.permute(1,2,0), pred.cpu(),
    torchvision.transforms.functional.crop(
            test_labels[i], *crop_rect).permute(1,2,0)]
d2l.show_images(imgs[::3] + imgs[1::3] + imgs[2::3], 3, n, scale=2);
|
